
High Level Overview of Mount Escapes
Build your knowledge on Mount Escapes

Scope.
In this post, I wish to explore the topic of mount escapes. I will focus on the blueprint that underpins all escapes, the top player’s goals, directions of escape and explore a list of known mount escapes with links provided.
The Blueprint to Successful Escapes.
Pins rely on a combination of wedges and bodyweight to be effective. By disrupting their weight distribution and degrading their wedges, we can successfully escape. Here is my blueprint for escapes:
To reliably escape pins in BJJ, you must incrementally fight to reclaim key pieces of Inside Position. When you hold more (significant) pieces of Inside Position compared to your opponent and have altered their weight distribution, you have succeeded in escaping.
Understand The Top Person’s Goals.
The top person has a hierarchy of mount configurations that they seek to transition through to bolster their pin and to attack submissions. Let’s understand what they are and how it makes escaping harder.
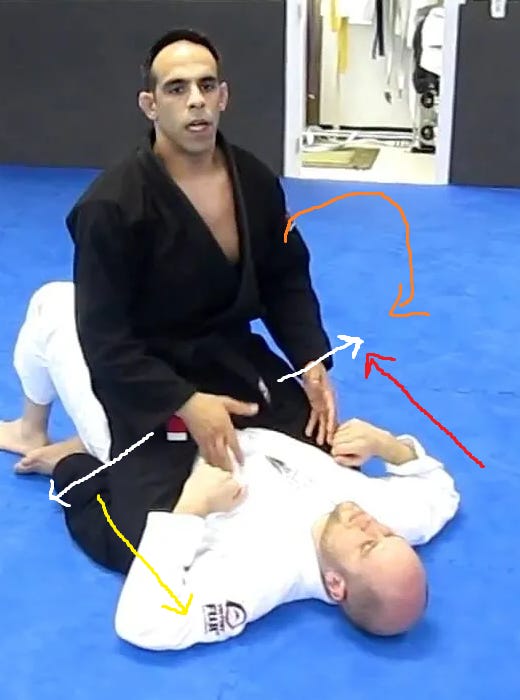
Migrating upwards across our torso into high mount

As illustrated by the image above, the top player would like to migrate upwards towards our head. In doing so, they own the space between our arms and our torso, effectively making them useless. Since their hips and no longer atop ours, the force of our bridging motion cannot be effectively conducted into them to alter the weight distribution. Needless to say that is bad for us.
Isolating our arms (securing one or more underhooks)

As we touched on in the earlier point, getting inside position relative to their torso and arm is a goal of the top person. Securing an underhook is a manifestation of this inside position goal as it takes and neuters the effectiveness of their arm in assisting with escapes. The underhook also makes isolating their arm possible to set up submissions.
Isolating arms can also take the form of two on one grips on one of our opponent’s arms. Think of an Americana as an example.
Securing a crossface

The goal of this crossface is to wedge our head in place and shut down escapes by denying us the ability to turn our head in one direction. The side which we cannot turn towards is the side we cannot elbow escape towards. The crossface also serves to pin us in place while the top person works towards an underhook.
Exerting Lower Body Control

Our opponent would like to establish control of our lower body through the use of grapevines as seen above or through the crossing of their ankles. The purpose of these lower body controls is to deny the bottom person the ability to use our legs to escape mount. The grapevines prevent us from elbow escaping and denies us the ability to bridge. Crossed ankles hides their feet from outside elbow escapes.


Start With Connection and Weight Distribution
Now that we know generally how the top person wants to play the mount position, a quick assessment of the mounted situation is necessary.
Connection and Weight Distribution are key principles of BJJ. Let’s think about the mount position through these principles. How our opponent configures their body will change how we escape. I will use the images below for my discussion:

How is my opponent CONNECTED to me?
In the image above, we can see that our opponent’s hips are on top of our hips. Their shins run parallel to our torso on both sides and our torso is in the space between their legs. We can think of their legs as wedges that prevent us moving our hips moving horizontally from left to right and these wedges are reinforced through their weight distribution
How is my opponent’s weight distributed?
We can visually see that their knees and shins bear their weight by virtue of them touching the ground. We also bear their weight on our stomach/hip area. A key callout here is our opponent’s posture which is upright. This means their weight is distributed mainly across a vertical plane rather than horizontally which we will explore soon.

In this example however, their posture is different and there is chest to chest connection. Their weight is now distributed across our torso in addition to our hips and on the ground through their legs and arms. We also see an underhook in play here which is a new wedge in play and we can also think of their chest as a wedge to prevent us from sitting up.
Directions of Mount Escape Techniques.
Let’s explore the directions of movement that will result in our escape.
Moving out from underneath their hips (downwards or upwards)
As shown in Yellow and Red above, moving either downwards or upwards to extract our body from under them. You can also think of leg extraction upwards toward our head or bringing our torso extraction down towards our feet.
Leg Extraction Escapes: Kipping Escape, Inside Elbow Escape
Torso Extraction Escapes: Wedding Sweep/Escape, Hail Mary Escape
Horizontal Extraction (right or left)
If we can unweight one of their leg wedges around our hip, we can perform an escape that involves freeing our leg on the now lightened side.
Outside Elbow Escape is an example where we trap a leg and unweight it in order to extract ourselves out horizontally
Rotational Escapes
If we can redistribute the top person’s weight drastically off our torso and hips, there is no reason why our torso cannot rise off the ground and become unwedged.
Trap and Roll/Upa/Bridge and Roll Escape is one example of a rotational escape where we redistribute the top person’s body weight drastically to free ourselves.
Demian Maia Escape: more on this later but this is a rotational escape where we roll ourselves to reverse the position.
You Must Get Inside Position (frames)
Reliable escapes start with getting inside position. There are a two places on their body that we must dominate in order to escape. We do this by employing frames that steal the inside position from the top person. It is these frames that allow us to start escaping.
Inside Elbow Frame

As we can see in the image above, one of our elbows must dominate the space between their knee and our torso. Our elbow placement here serves as a strong frame that denies them the ability to pinch their knees together as our elbow can be used to push to create distance or simply act as a doorstop.
Cross Hip Frame

I couldn’t find a good picture as it is hard to demonstrate mount whilst showing the hip frame. Placing your forearm across their stomach/hip area prevents them from advancing upwards which we know is one of the top persons goals. You also essentially hide one of your arm from an underhook.
YOUR ELBOW CANNOT PASS THEIR CENTRELINE OTHERWISE YOU EXPOSE YOUR BACK.
Inside Leg Position
We must own the space between their legs at all costs. We cannot tolerate locked ankles or grapevines being employed on us. our calves and hamstrings must be in contact with the ground only.


Escape Techniques + Their Rules.
Once we get these frames in place, we can now start our escapes. We will now explore a list of mount escapes with links embedded for your reference, plus explain the rules that make them work (or fail)
Kipping Escape
If you have no idea what the kipping escape is, please view the links below:
Rules for Kipping Escape:
An opponent with upright posture in mount means the kipping escape will FAIL. This is because the kipping escape needs their bodyweight distributed away from their centre of gravity and not concentrated on your hips.
The kipping action of your legs is designed to fight against the strength of their locked ankles or pinched knees, not their main body weight. If the top person is not bearing their weight on their arms, this will not work.
Inside Elbow Frames and or Cross Hip Frames are ESSENTIAL for consistent results. Try to achieve them before trying to kip.
Kipping escape will work against top person’s locked ankles.
Outside Elbow Escape
Here is the video reference: Outside Elbow Escape by John Danaher
Rules for Outside Elbow Escape:
Their feet must be accessible to ours in order to even begin the escape. If they are too far up our torso, the outside elbow escape is useless.
Instead of coming over the top and reaping the ankle we can use our instep to hook their ankle into quarter guard.
Cross hip and inside elbow frame is ideal for this escape.
We must win the lower body inside position battle. We cannot have our legs entangled in any way or encounter any locked ankles.
Inside Elbow Escape
Here is the video reference: Inside Elbow Escape
Rules for Inside Elbow Escape:
We can perform this escape when they have locked feet. It will be slightly more difficult than unlocked feet but it is not significant enough to degrade our escape.
Must get inside elbow and cross hip frame.
Works if they are postured up or if they are postured down (crossface etc)
Wedding Sweep (Double Unders Escape)
Here is the video reference: Wedding Sweep
Rules for the Wedding Sweep
We must get both arms through the gap between their legs for this to work.
The best time to do so is when they switch to S mount and space develops for you to pummel your arms in
For this to work best, no underhooks and chest to chest disconnection from the top player must occur in order to pummel our arms inside.
Trap and Roll (Upa)
Here is the video reference: Trap and Roll Escape
Rules for Trap and Roll Escape
We must have control of the top player’s arm before attempting this. High mount makes this escape useless as we cannot conduct force from our bridge into them.
Can work when bottom person’s arm is underhooked. In fact this escape works best when baiting someone into an underhook.
We can bridge towards the side of their crossface provided they exert superficial pressure
Hail Mary Mount Escape
Here is the video reference: Hail Mary Mount Escape
Rules for Hail Mary Mount Escape
You must have some level of flexibility.
You must be under a high mount.
Watch this escape in a real MMA fight:
Conclusion
One last point before I finish. Utilise combinations of mount escapes in order to improve your odds of success. It may be unlikely that your first attempt succeeds, but when it does fail, chain it with another escape to follow up on your opponent’s reactions.
To conclude, always fight back to inside position and get frames established. From there it will be much easier to escape the mounted position. Be mindful of how your opponent configures their body and how they distribute their weight. They knowledge you have gained from this post will be the catalyst for your skill improvement. All that’s left to do is to do many rounds of mount escapes to solidify your understanding and see your skills manifest in reality.